This is the user manual for the Credit Card Photography Scale Rectifier — a free, browser-based tool that removes perspective from a photo and rescales it to true millimetres, using the Credit Card Photography Scale as a reference. Everything runs on your own device; photos are never uploaded.
What you need 1. Photographing 2. Loading 3. Detect & adjust 4. Rectify 5. Measuring Tips Troubleshooting FAQ
What you need
The Credit Card Photography Scale card and a photo that contains it. The tool relies on three features printed on the card:
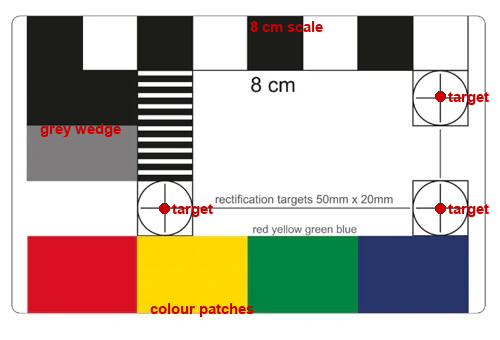
- Three crosshair “rectification targets” on a precise 50 mm × 20 mm grid — these set the geometry and scale.
- Four colour patches (red, yellow, green, blue) — used to locate the card and as extra control points.
- The 8 cm scale bar and its black squares — extra control points along the top, plus a visual scale check.
1. Photographing the object
- Lay the card flat next to your object, on the same surface, so both are in the same plane.
- Get both the card and the object fully in the frame, and keep the card away from the extreme edges of the photo (less lens distortion there).
- Shoot as square-on (top-down) as you reasonably can. The tool corrects tilt, but a flatter angle gives the cleanest result.
- Use even lighting and avoid glare/reflections on the glossy targets.
- Make sure the card itself is not bent or lifted at a corner — a warped card can’t be perfectly flattened.
2. Loading the photo
Open the tool and drop your photo onto the left panel (or click it to choose a file). The original appears on the left; the rectified result will appear on the right.
3. Auto-detect & adjust the targets
Detection runs automatically: the tool finds the card and places three handles on the crosshair targets (numbered 1 = corner, 2 = left, 3 = top), plus magenta dots on the detected colour patches.
- If a handle isn’t exactly on a crosshair centre, drag it onto the centre — a magnified loupe appears while you drag for precise placement. The handles are hollow reticles so the target stays visible underneath.
- Fine drag: hold Shift while dragging to move the handle at ¼ speed for detailed control.
- Nudge with arrow keys: click a handle to select it, then use the arrow keys to move it 1 pixel at a time (Shift + arrow = 5 pixels) — the most precise way to place it.
- You can re-run detection with the Auto-detect targets button.
Accuracy comes from the three crosshairs sitting precisely on their centres. A 1–2 pixel nudge (drag or arrow keys) is usually all it takes.
4. Rectify & download
- Click “Rectify →”. The flattened, to-scale image appears on the right.
- Tick “show mm grid” to overlay a millimetre grid — the 8 cm bar should span exactly 80 mm (8 large cells), confirming the scale.
- Tick “fix colours” to white-balance the image using the card’s white areas.
- Click “Download rectified PNG” to save the corrected image.
5. Reading the scale & measuring
The status line reports the output scale in pixels per millimetre (e.g. 17.4 px/mm).
To measure anything in the rectified image, measure its length in pixels (in any image editor) and divide:
length in mm = length in pixels ÷ (pixels per mm)
Because the whole image is rectified to one uniform scale, this works anywhere in the picture — not just on the card.
Tips for best accuracy
- Card flat and unbent; object in the same plane as the card.
- Shoot fairly square-on; keep the card near the centre of the frame.
- Fine-tune the three crosshair handles to the exact centres.
- Use the mm grid to sanity-check against the printed 8 cm bar.
Troubleshooting
“Loading OpenCV…” never finishes
The computer-vision engine (~10 MB) is downloading; give it a few seconds on first use, then it’s cached. Check your connection if it stalls.
Auto-detect put a handle in the wrong place
Just drag it onto the correct crosshair centre with the loupe, then Rectify. Detection only needs to get close.
The card comes out slightly skewed at one corner
Usually the card wasn’t perfectly flat, or it was near the edge of the frame (lens distortion). Re-shoot with the card flat and more centred.
It can’t find the card
Make sure the colour patches are visible and not in deep shadow, and that the card contrasts with the background. You can still place the three handles manually and Rectify.
FAQ
Are my photos uploaded anywhere?
No. All processing happens in your browser; nothing is sent to a server.
Which card does this work with?
The Credit Card Photography Scale (85.6 × 54 mm, with the 8 cm bar, colour patches and 50×20 mm crosshair targets).
Does it remove lens distortion?
No — it corrects perspective (a planar homography). For minimal distortion, shoot from a bit further back and keep the card centred.
Independent tool, not affiliated with or endorsed by Past Horizons. “Credit Card Photography Scale” is the property of its respective owner.